User guide

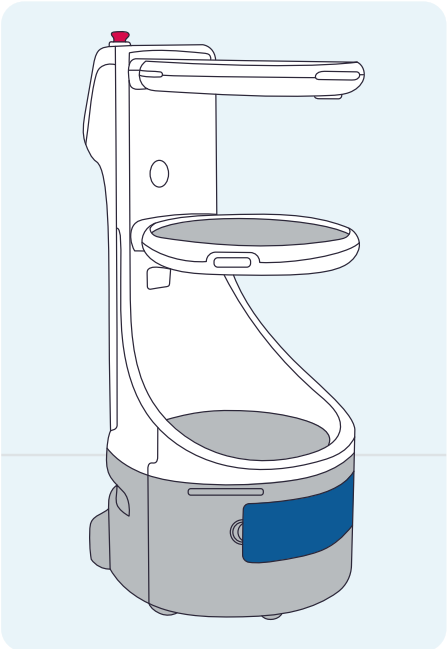
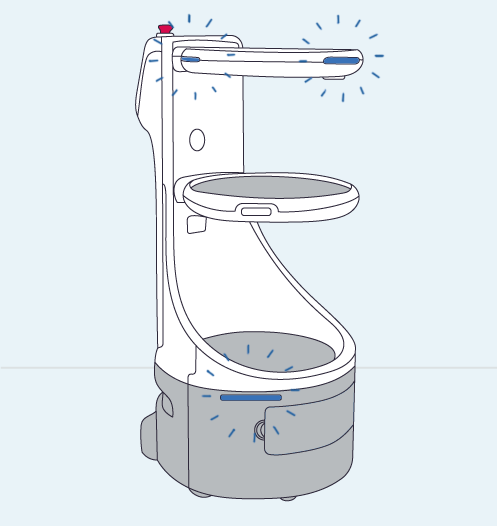
The serving Cobiot

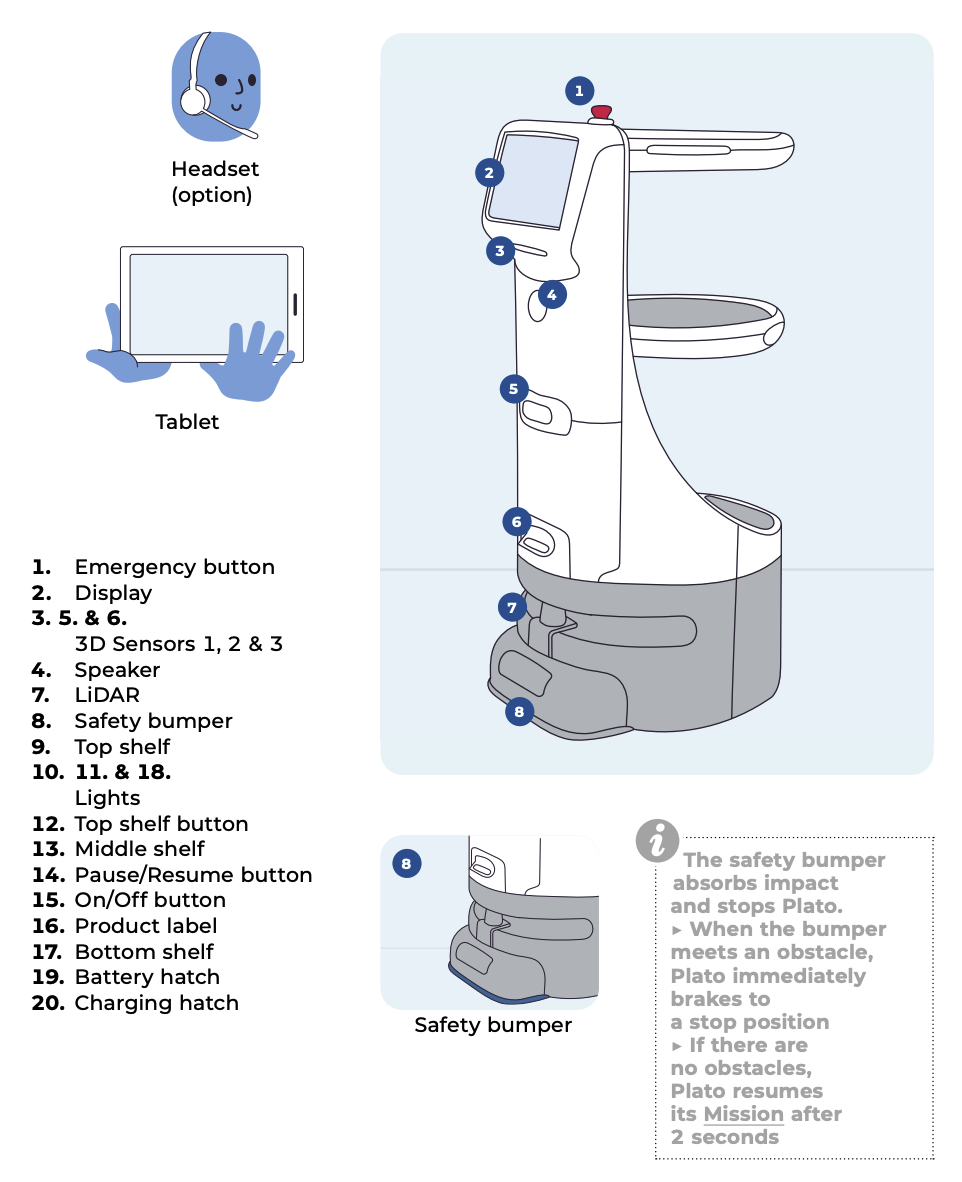
Overview
Plato helps you deliver food or drinks to your customers and collect their dishes. Enjoy the company of your new friend!
What’s in the box
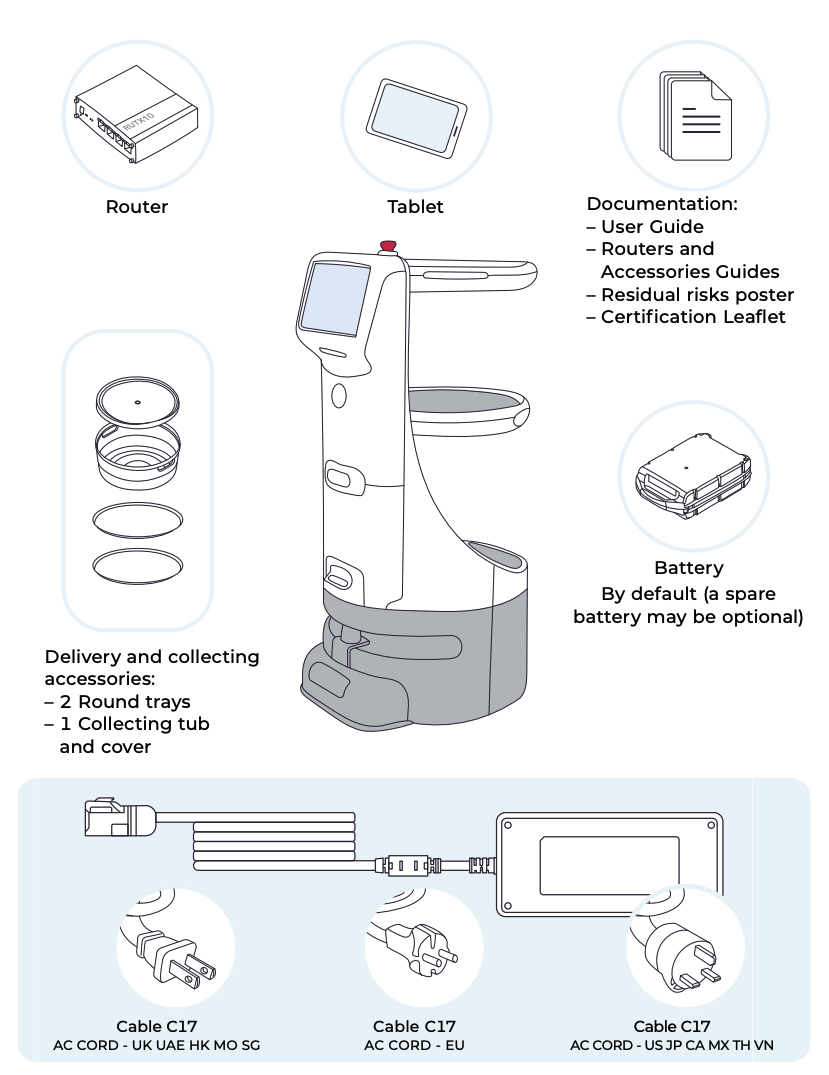
Battery Charger with AC cord
Depending on the standards in force in the destination country
Unboxing Plato
Follow the instructions on the Plato packaging.
Plato’s packagnig may differ from one version to another.
Unboxing and Activating Your New Serving Cobiot, Plato - Horizontal Packaging - V1
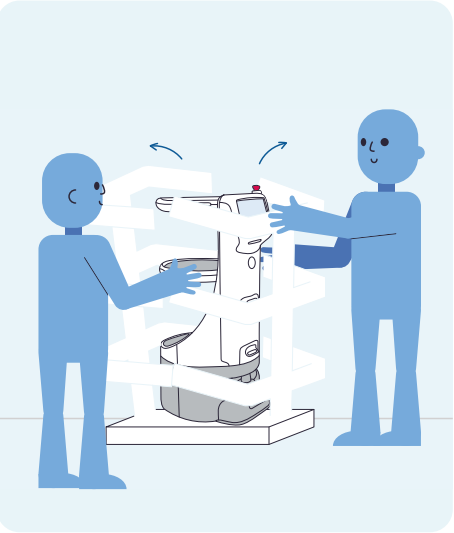
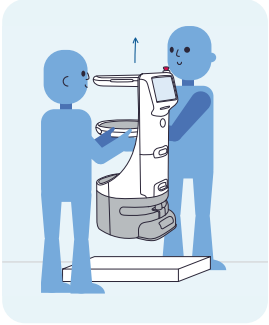
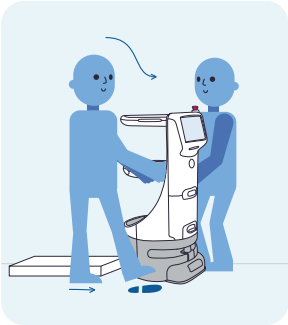
Unboxing and Activating Your New Serving Cobiot, Plato - Vertical Packaging - V2
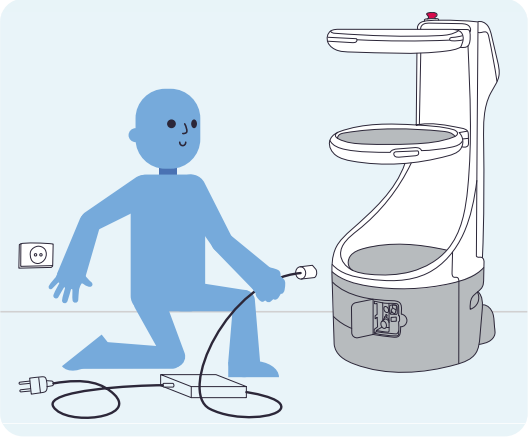
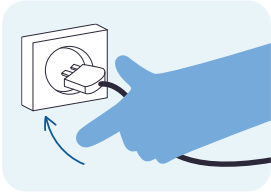
Charging Plato

🔴 Plato is charging
🟢 Plato is charged
Fully charge Plato before first use and at the end of each shift.
Fully charge Plato before first use
It is recommended to maintain the battery level between 30% and 80% for extended product life.
Even when not in use, charge the battery every 5 months if the battery is stored at 30% and every 20 months if the battery is stored at 100%.
Battery life: the battery guarantees 12 hours operation for Plato depending on use.
Charging time: 3 hours 30 minutes (0>80%) 7 hours 30 minutes (0>100%) for 240 W.
Shutdown: Plato turns off when the battery level is ≤6%.
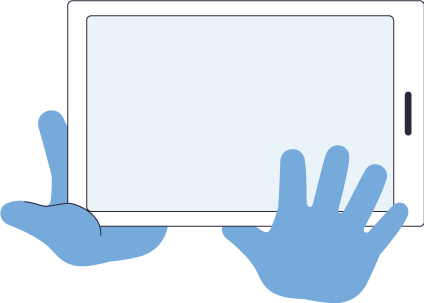
See the manual included in the tablet box to learn how to charge it
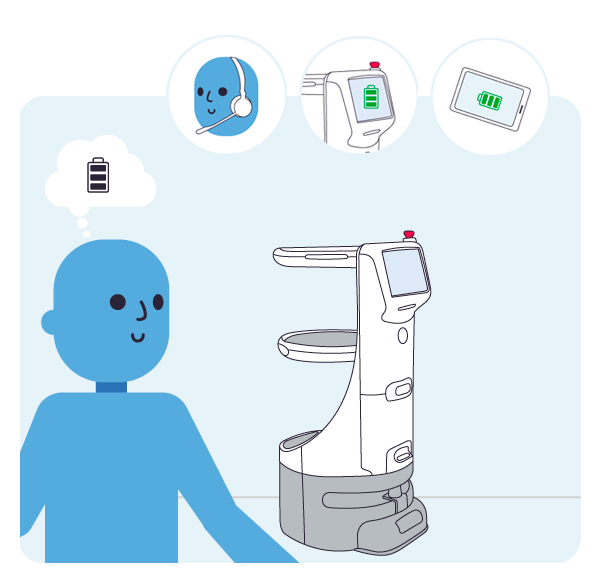
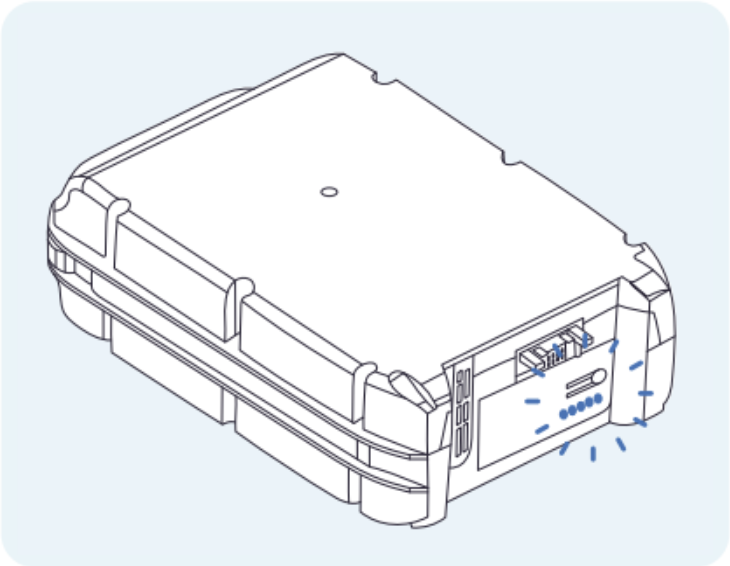
- The Plato’s battery level is indicated in the top left corner of the Display
- Plato warns you in the Headset if the battery level is too low
Quick and Easy Charging Tips for Plato
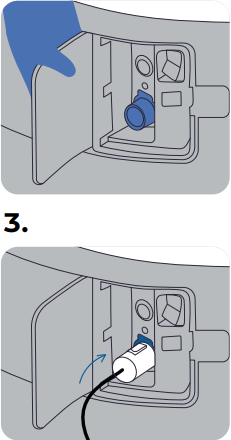
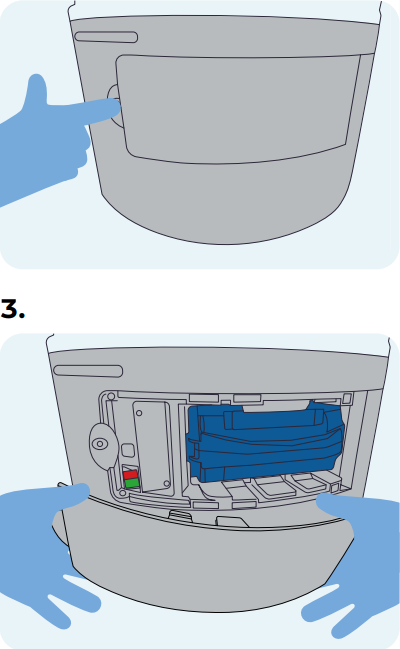
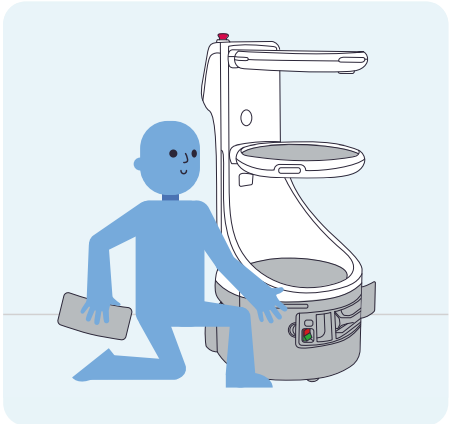
Removing the battery from Plato
DO NOT remove the battery if Plato is turned on.
Make sure Plato is turned off and unplugged before removing the battery.
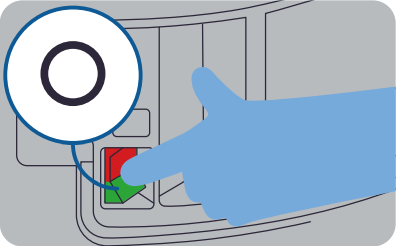
Understanding Plato’s battery’s level
Push the state of the charge (SOC) button to display the level of charge of Plato’s battery.
| 🔴🟠⚪⚪⚪ | 0% <= SOC <= 10% |
| 🔴🟠⚪⚪⚪ | 10% <= SOC <= 30% |
| 🔴🟠🟢⚪⚪ | 30% <= SOC <= 50% |
| 🔴🟠🟢🟢⚪ | 50% <= SOC <= 70% |
| 🔴🟠🟢🟢🟢 | 70% <= SOC <= 100% |
Getting Started
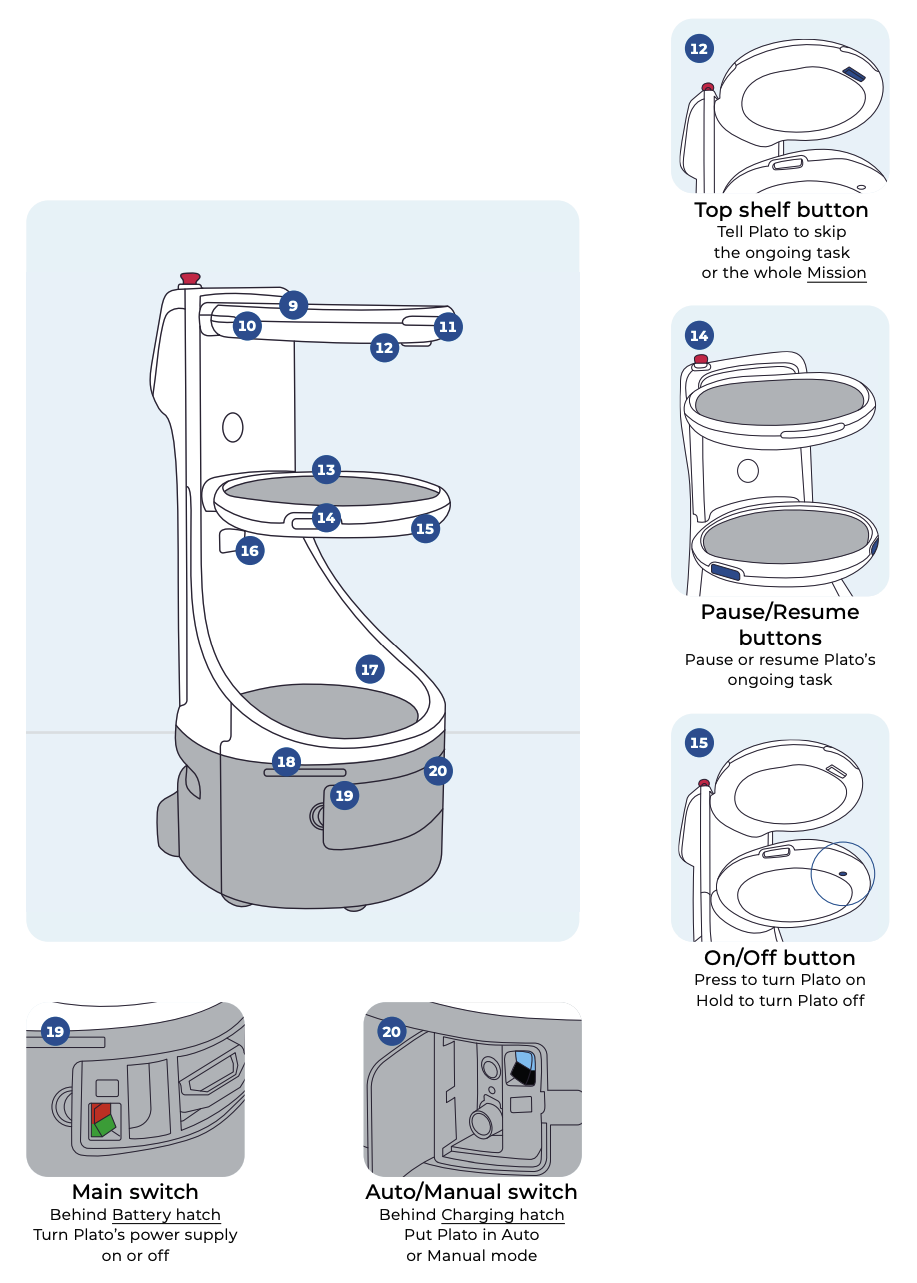
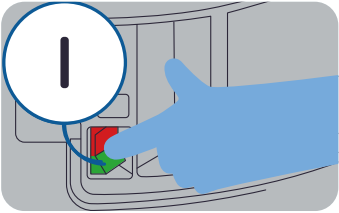
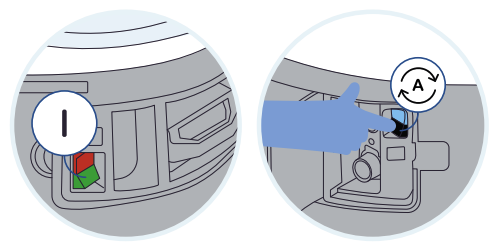
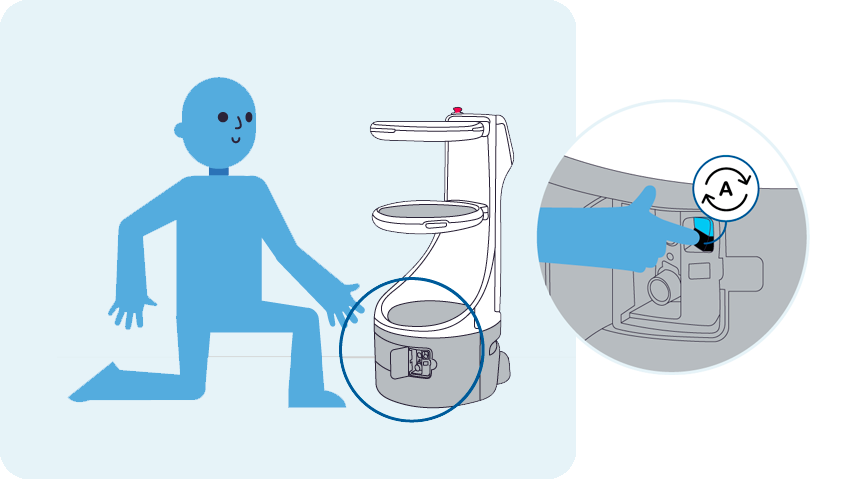
Turning Plato On
Press the On/Off Button for 2 seconds
Check that the Main switch is in the l position and the Auto/Manual switch is in the A position.
Setting up Plato for the first time
Follow the instructions on Plato’s display and the Tablet to configure Plato.
Refer to the additional Router’s guide to check how to setup 4G router and/or WIFI router.
How to do the first Setup for Plato
Mapping
To have Plato ready to navigate in your space, you first need to map your place and
annotate it.
Mapping with Plato is easy. Just follow these recommendations!
Preparing your room
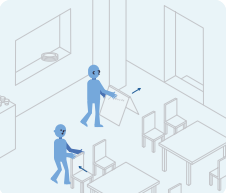
Set the room as for a regular service
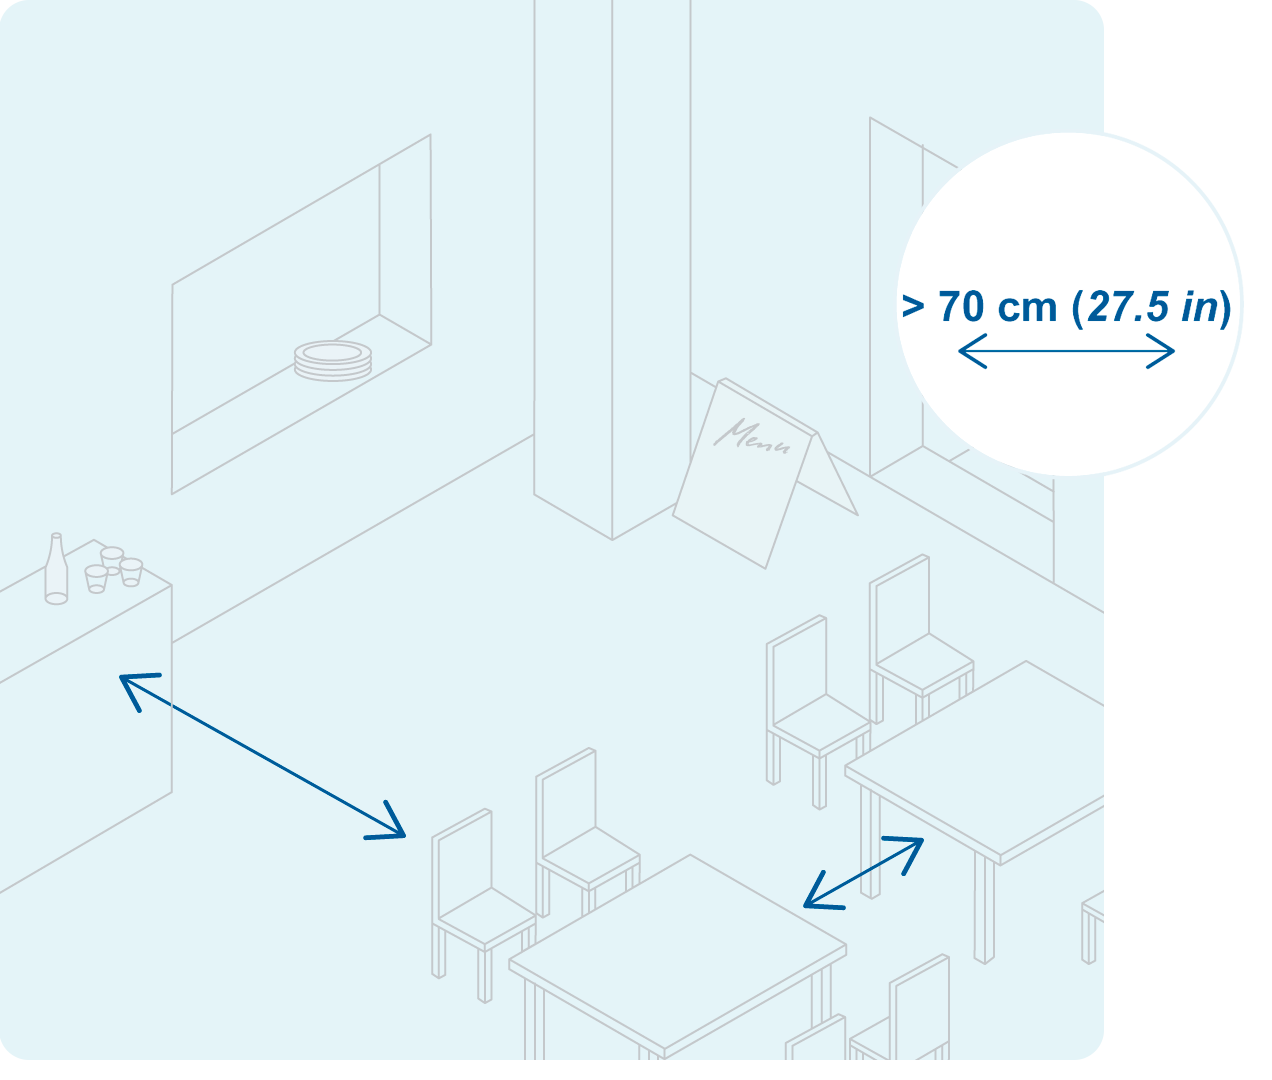
Make sure that the Plato path is at least 70 cm wide (27.5 in)
Make sure nothing and nobody obstructs the path
Turn on all the lights in the room. Prepare the room as for the service and move the chairs back from the tables.
Mapping your room

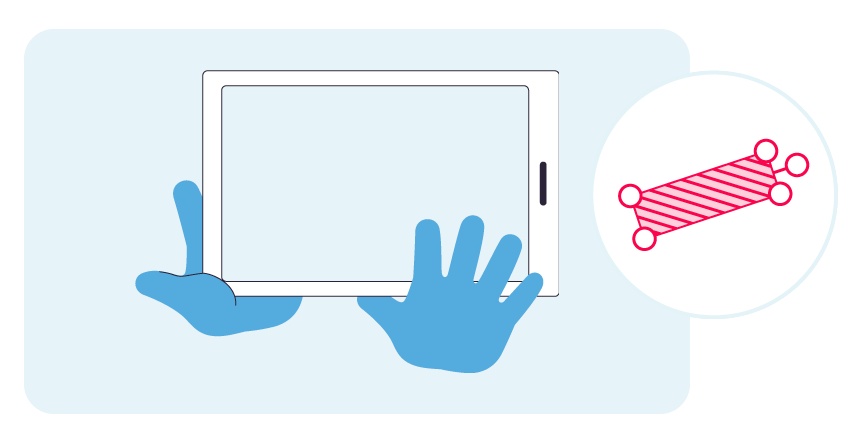
On the Tablet, open the menu and go to Mapping
Put the Tablet on the Top shelf and follow the instructions

Set the Auto/Manual switch to the M position
Then, on the Tablet click on Start mapping
Hold the Top Shelf like a steering wheel and push Plato forward
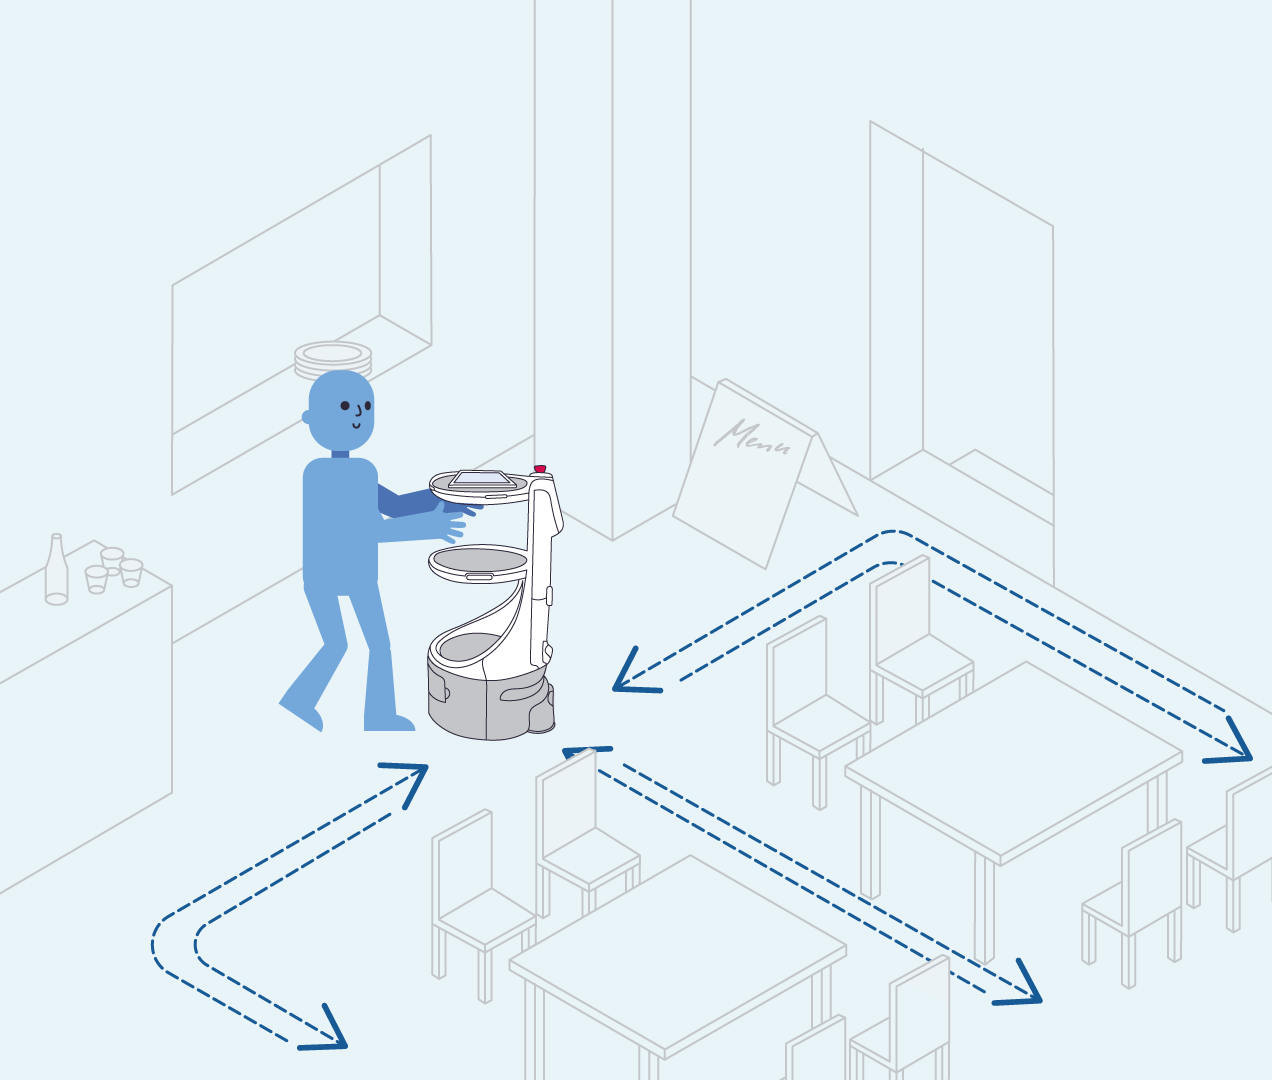
Move Plato back and forth along all the paths Plato must go
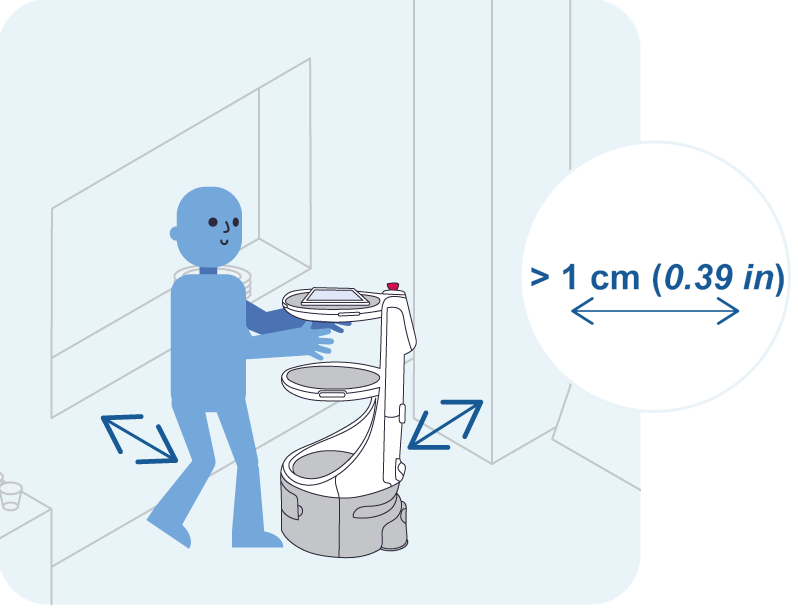
Move Plato up to 1 cm (0.4 in) from walls and obstacles

Then return to the starting point to complete the mapping
Finally, click on the Finish and save button
CHECK THE MAPPING RESULT BEFORE SAVING
Move Plato over the paths until all paths are white and clean on the map.
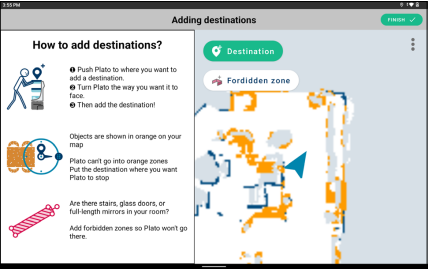
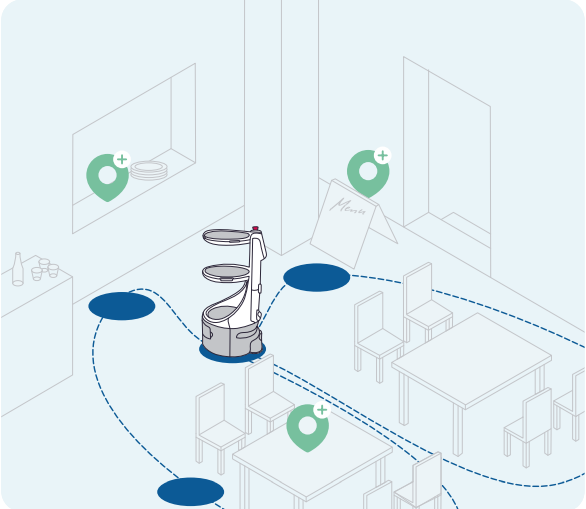
Adding annotations
Create and edit a Destination for each table and useful points of the service where Plato should go.
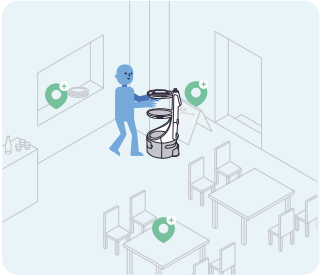
Move Plato to a strategic position

Then, on the Tablet click on the Add Destination button
3. Choose Plato’s orientations for a Destination

a. Plato’s screen facing customers
b. Shelves facing customers
Choose helpful destinations as relay area
Plato can assist kitchen staff and waiters, by servicing areas where waiters pick up or drop off dishes
Creating forbidden zone
Edit and create Forbidden Zones where Plato can not go (shown in red on the map).
Move Plato past all obstacles, glass doors, mirrors, escalators and stairs
Add a forbidden zone for each location with the Add forbidden zone button
Resize and rotate the forbidden areas on the map to fit
Prepare the room for the service and anticipate the movement of furniture by adding a Forbidden Zone around furniture that may be moved.
Areas that could cause Plato to fall, such as slopes, steps, stairs or escalators, MUST be protected by physical barriers.
Please refer to the safety instructions in this guide.
Testing a map with a Mission
Once the mapping is complete, test the destinations with a training mission.
Set the Auto/Manual switch to the A position
On the Tablet, add all the Destinations to a mission
Press Start for Plato to begin the Mission
Check Plato’s behaviour with a test map and a few destinations to identify any areas where Plato might have difficulty finding his way.
You can create several maps for different room layouts, environments or services (for example, self-service buffet, table service or conference room).
At the beginning of your service, activate the appropriate map saved according to the room configuration.
When you have completed the room mapping and added Destinations,
Plato is ready to help you!
Mapping Your Environment with Plato : A Step-by-Step Guide
Poster
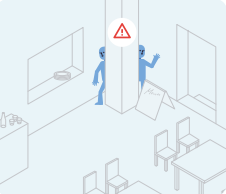
Display the poster at each entrance to your establishment so everyone knows Plato works here and is aware of the residual risks
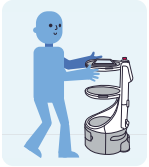
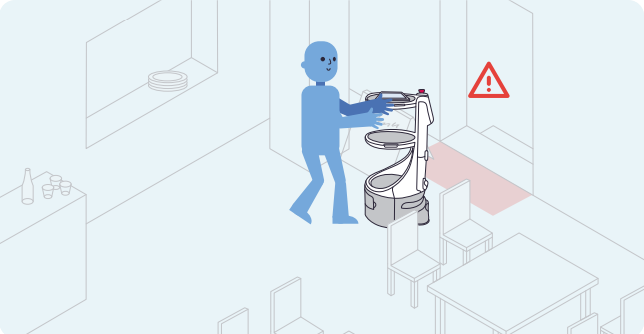
Operating Plato
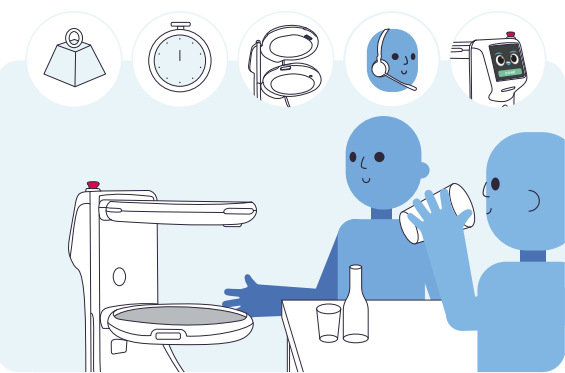
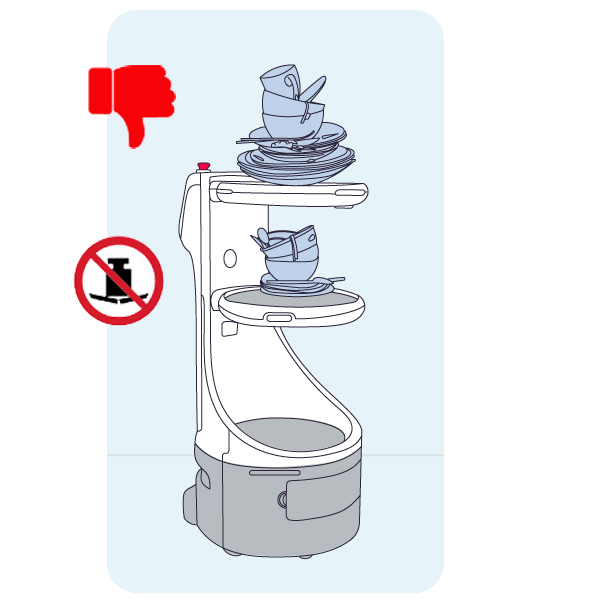
Each shelf, including accessories, has a maximum load of 10 kg.
Plato is not compliant with the Food Contact Directive. Do not place unprotected food (pieces of bread, fruit with edible skin, etc.) directly on Plato. To carry unprotected food, please use the appropriate food contact accessories.
A collision or any other emergency stop situation may cause loads to fall from Plato, which could cause serious injury. Restaurant staff must ensure the stability of dishes and any other items loaded on shelves before starting a Delivery, Collecting, Birthday or Cruise task.
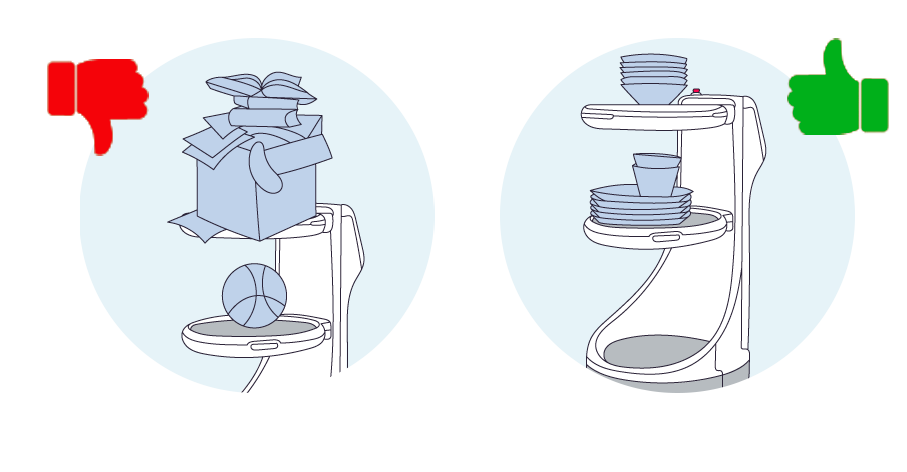
Aldebaran is not responsible in the event of injuries following such an incident. Aldebaran provides accessories for various types of dishes and glasses to help ensure the stability of loads on Plato. Please contact your distributor for more information.
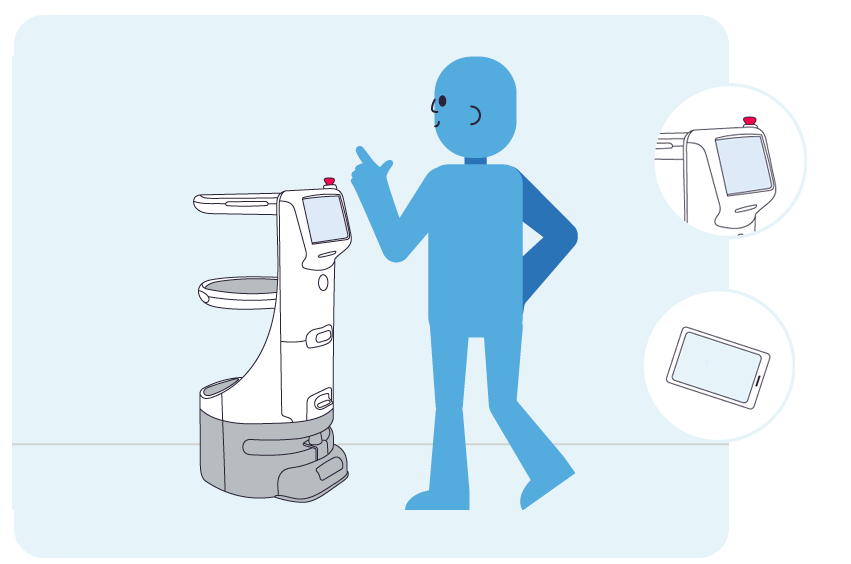
Customising Plato with the Settings
On Plato’s display or the Tablet, go to the Settings menu.
Press 3 seconds on the Advanced settings button to access Advanced settings.
Unlocking the Full Potential of Plato : Advanced Setup Tips
Creating a Service Mission
Plato can deliver something or someone with a Service Mission.
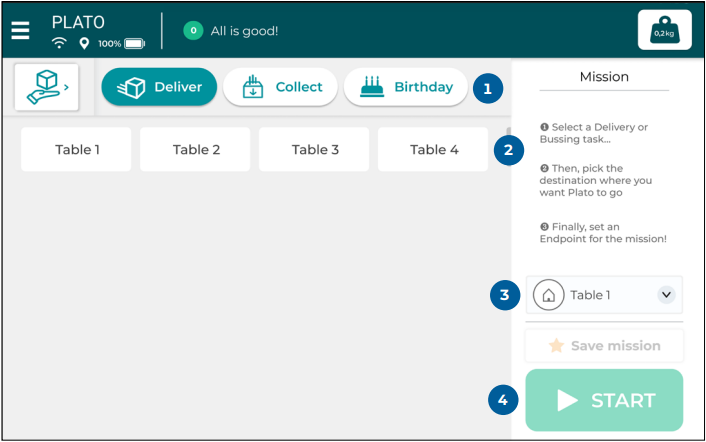
1. On Plato’s display or the Tablet, select a Delivery, Collecting or Birthday task
2. Select a Destination
3. Select an Endpoint
4. Press Start
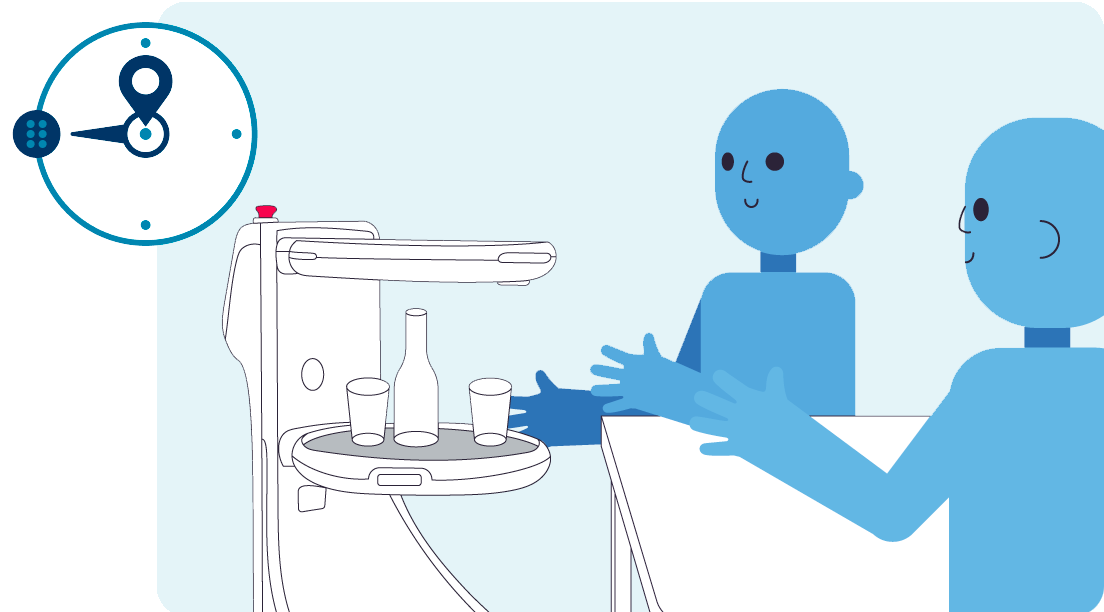
Delivery task
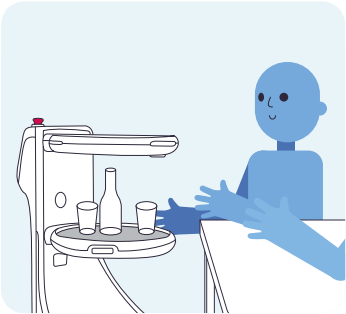
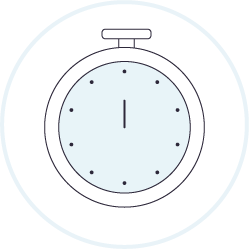
Arriving at the destination, Plato says something and waits for the dishes to be served.
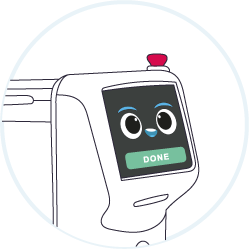
Plato leaves either when the shelves have been emptied, the timer has expired or someone presses the Done button or skips the task.
Collecting task
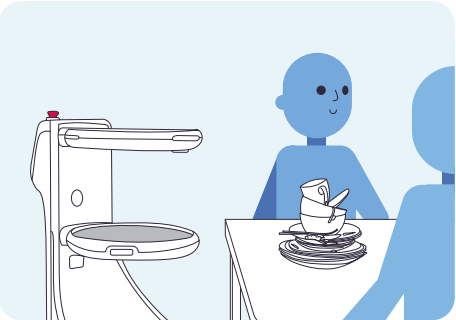
Arriving at the destination, Plato says to clear the table.
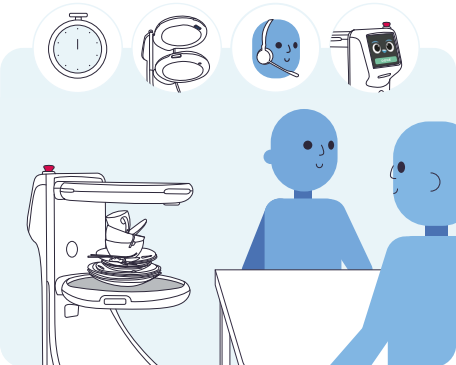
Plato leaves when the timer expires or someone presses the Done button, or skips the task.
Birthday task
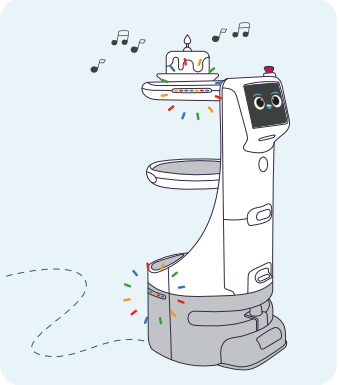
Plato goes to the destination singing a birthday song and turns on multicoloured lights.
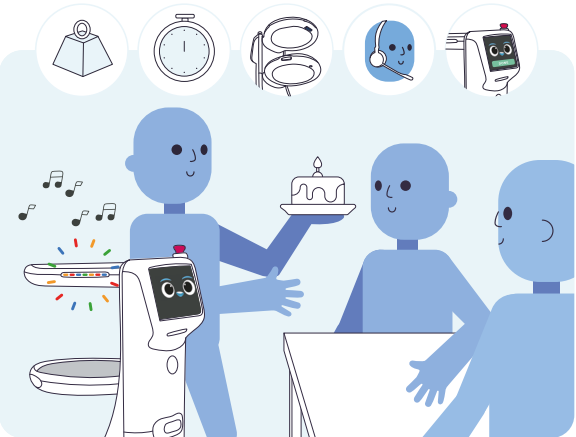
Plato leaves as for a Delivery task.
You can configure the end-of-task triggers in the Settings :
- Shelves have been emptied

- The timer has expired
- Someone presses the Done button

- Someone skips the task

At the beginning of a service and everytime an accessory is changed, you should press the Tare all shelves button on Plato’s display.
Creating a Cruise Mission
Plato can loop around several points with a Cruise Mission.

- On Plato’s display or the Tablet, go to the Mission configuration screen:
a. Click on the Switching mode button and select Cruise
b. Select a list of Destinations
c. Save the mission for future use - Press Start when Plato is ready to cruise
Pause Plato to edit or complete an ongoing mission
Setting the Follow Me mode
Interacting with Plato
You can interact with Plato in many ways during the missions.
Managing Plato during Missions
| SET AND START A MISSION | PAUSE AND RESUME A TASK | SKIP A TASK | CANCEL/END A MISSION | |
|---|---|---|---|---|
| Plato’s display | x | x | x | x |
| Tablet | x | x | x | x |
| Headset | x | x | x | x |
| Pause/Resume Buttons | x | |||
| Top Shelf Button | x | x |
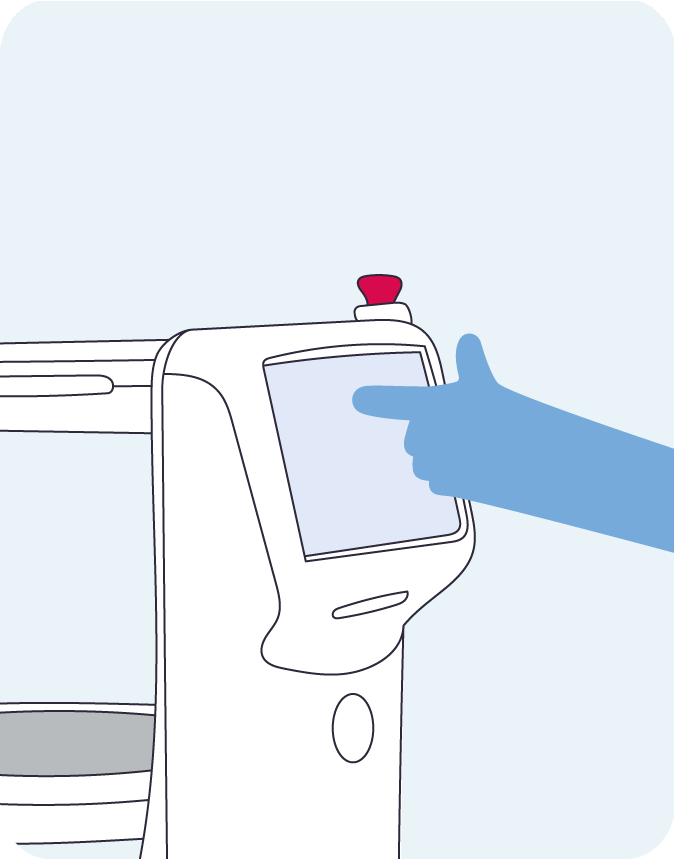
When Plato is navigating, you can also pause a task by double clicking with two fingers on the screen.
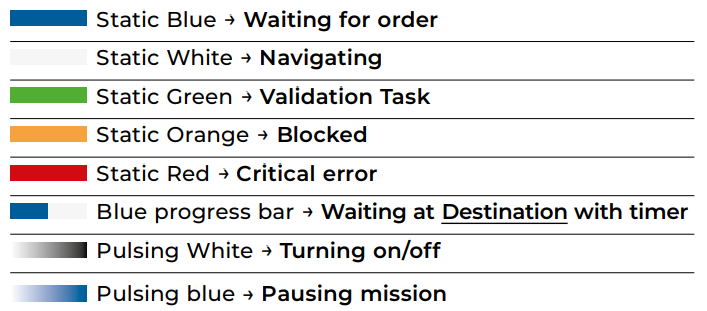
Understanding Plato’s lights
Listening to Plato’s feedback sentences
Plato can say Feedback sentences in various situations, such as when arriving at a table for delivery.
You can select which Feedback sentences Plato will say in the Settings.
How to customize Plato’s speech and display
Voice commands _ upon availibility
You can give commands and hear feedback from Plato with the supplied Headset.
- Refer to the supplied Headset documentation for full utilisation instructions.
- Voice commands is an optional feature, please contact your distributor for more information.
Setting up the headset
1. Go to
Plato’s Settings
2. Press Headset
pairing, then follow
the instructions
We strongly recommend using your native language when talking to Plato to get the best results.
If needed, you can change Plato’s language in the Settings.
Giving voice commands to Plato
Voice commands is an optional feature, please contact your distributor for more information.

Put on your Headset with the microphone in front of your mouth
Choose the task you want Plato to perform
Speak normally and avoid pausing verbally between “Plato” and the command
TIPS ‘N TRICKS FROM PLATO
Follow these tips for the most efficient experience
Name your Destinations so they are easy to pronounce
- Don’t use articles such as the, a or an
- Don’t name Destinations with a single letter
- Don’t use special characters or emojis
| DO | Don’t |
|---|---|
| Kitchen | X Æ A-Xii |
| Table 1 | The table 1 |
| P1 | P 1 |
The list of voice commands
| SERVE A TABLE | ”Plato serve (slowly) <destination>” / Plato go to <destination> (slowly)“ |
| CLEAR A TABLE | ”Plato clear <destination>” |
| BIRTHDAY MODE | ”Plato birthday at <destination>” |
| PAUSE PLATO | ”Plato pause mode” / Plato pause yourself” |
| RESUME FROM PAUSE | ”Plato resume your task” / Plato continue” |
| SKIP WAITING TIME AT THE TABLE | ”Plato move on” |
| CANCEL ALL TASKS | ”Plato stop your mission” |
| BE NOTIFIED ABOUT STATUS | ”Plato what’s up” |
Mastering Voice Commands for Plato: Tips and Tricks
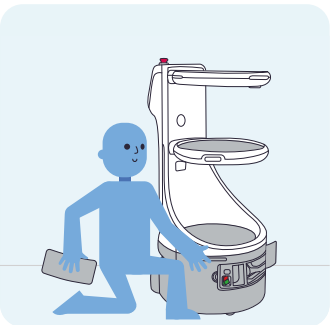
Taking care of Plato
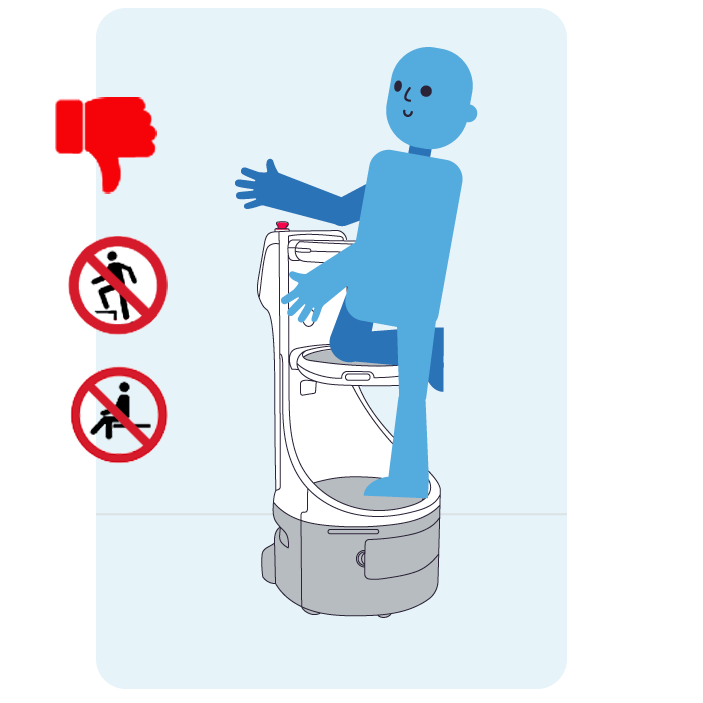
Don’t lift, bump, push, or climb on Plato
Don’t stack things on Plato and don’t exceed the maximum load
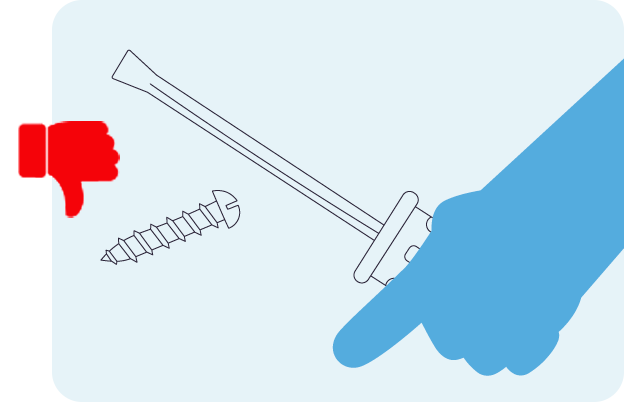
Don’t remove any screws or open any covers except the Battery hatch and the Charging hatch
Updating Plato
Moving Plato manually
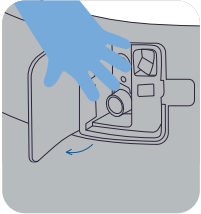
Open the Charging hatch
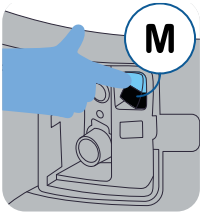
Set the Auto/Manual switch to the M position
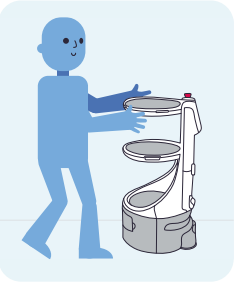
Hold the top shelf and move Plato by pushing it forward.
You can use the top shelf to direct Plato
When you’re done, set the Auto/Manual switch back to the A position so Plato can move safely on its own.
Regulatory authorities require the Auto/Manual switch to be tested once a month.
Turning Plato off
Hold the On/Off button for 3 seconds
Don’t flip the Main switch while Plato is On.
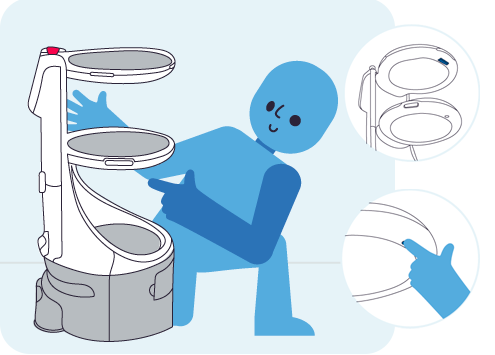
Cleaning Plato
Must be done at least once a week
Make sure Plato is turned off and unplugged.
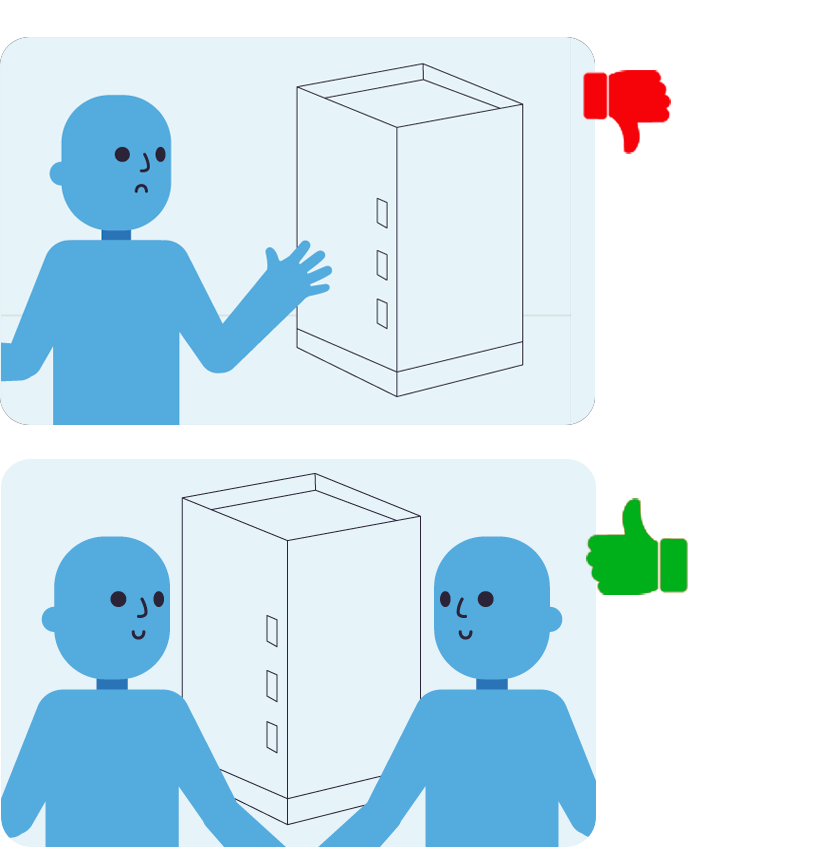
- 2 people are needed to lay down Plato
- Empty Plato and remove all accessories from its shelves
- Place a piece of soft material on the floor such as a towel or a rug
Wheels
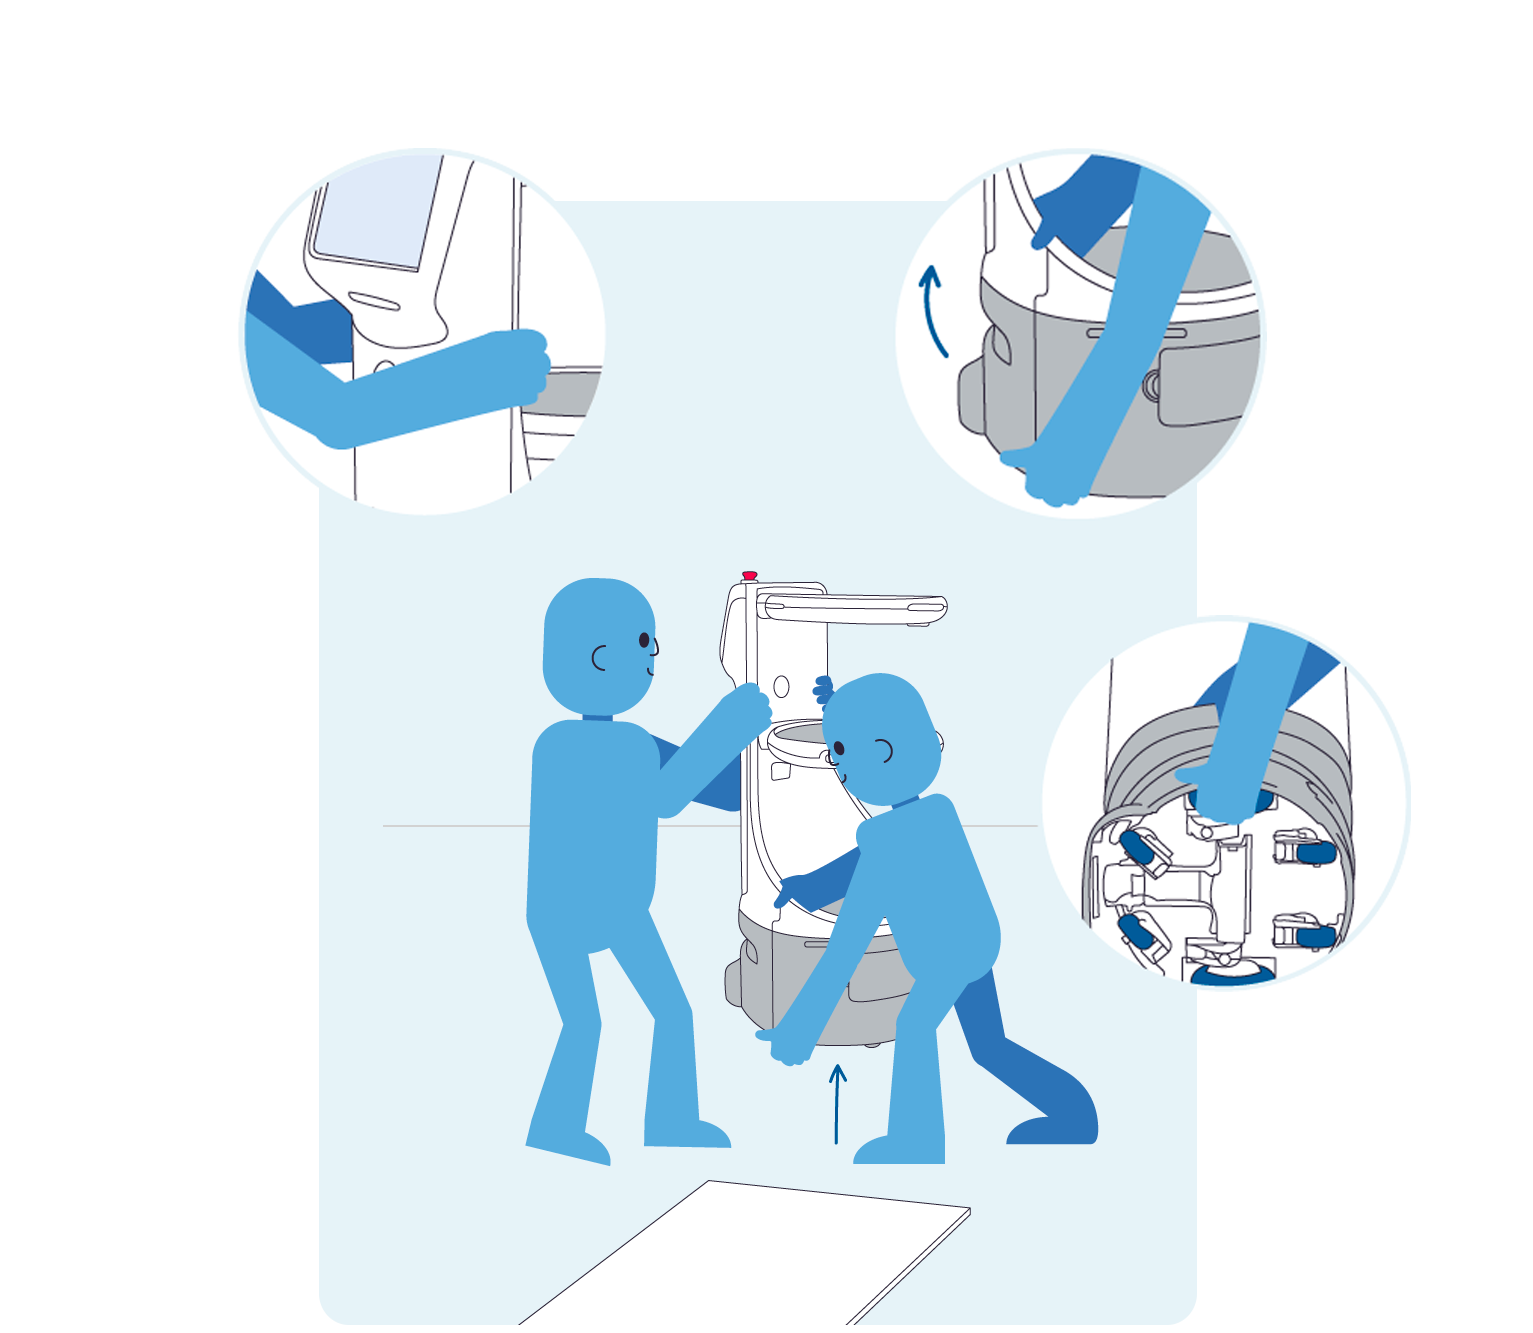 1. Hold Plato firmly
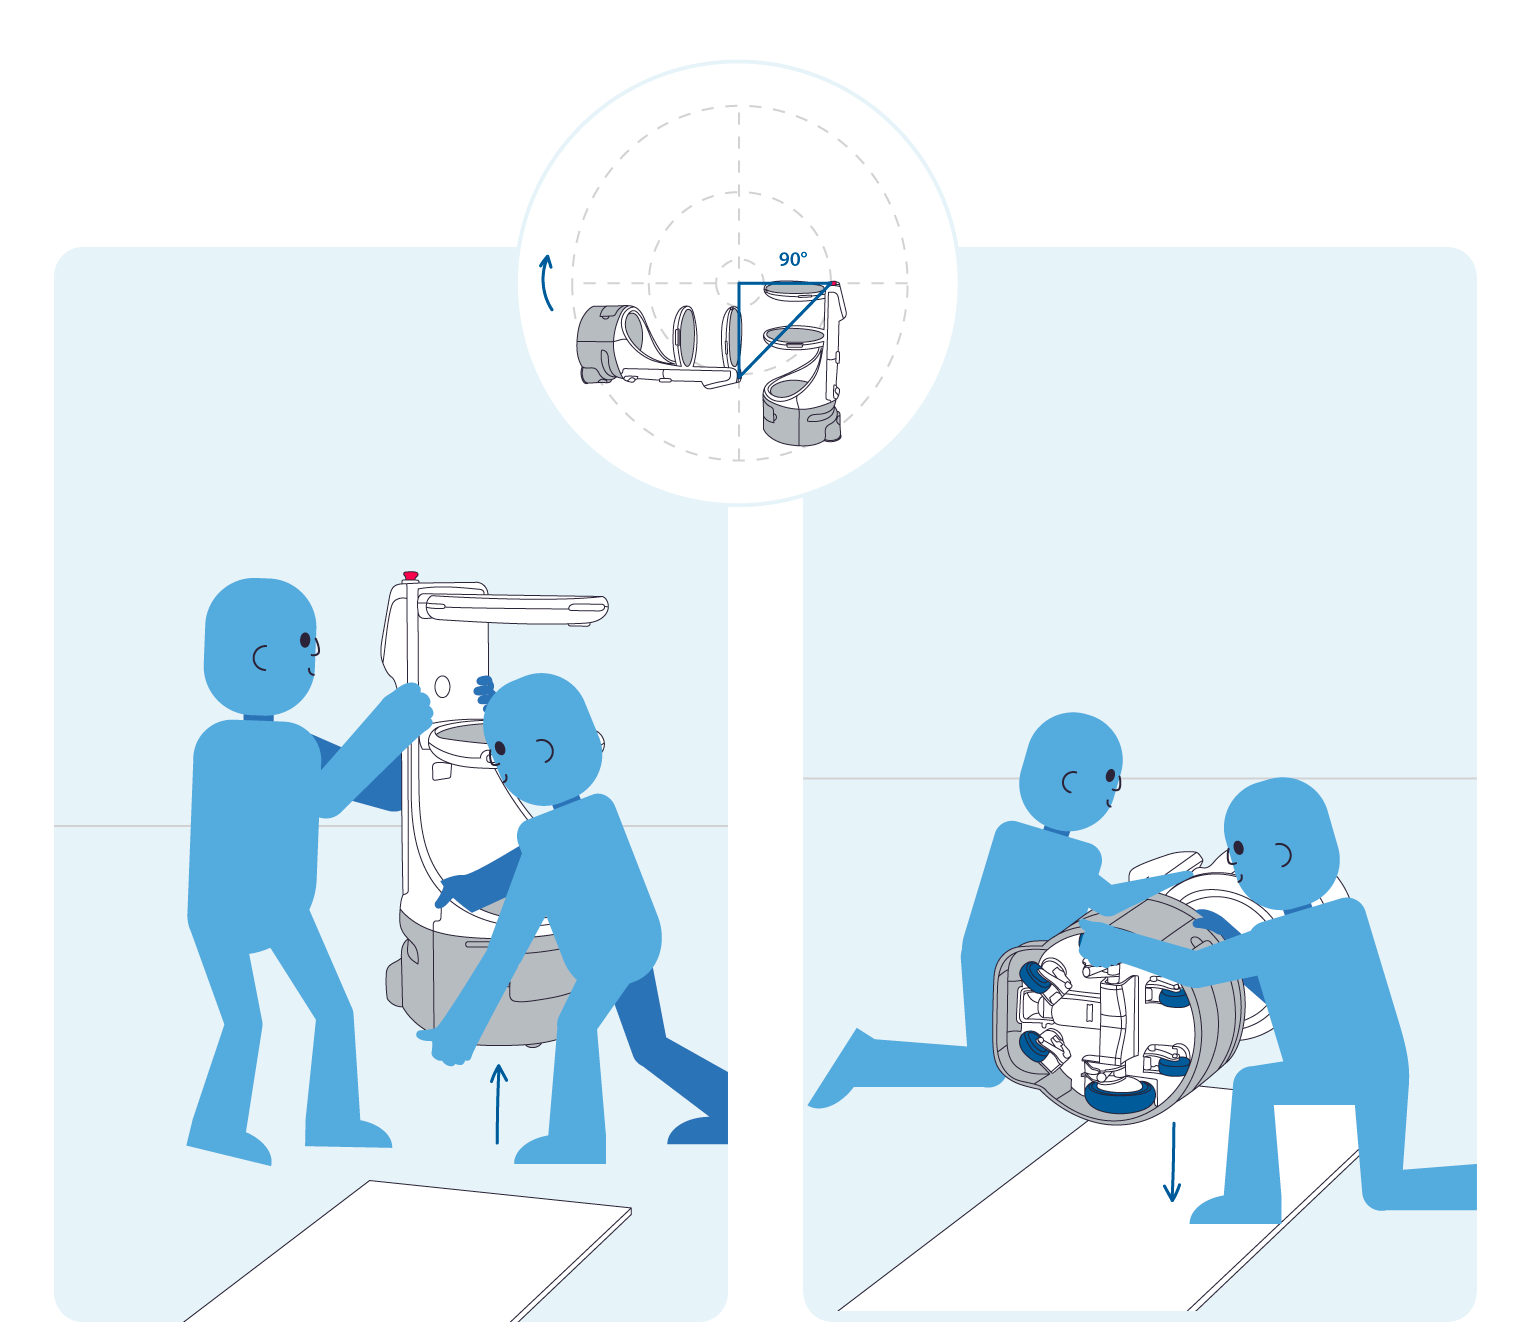 2. Lift Plato
3. Tilt Plato and gently lay it down on the piece of soft material
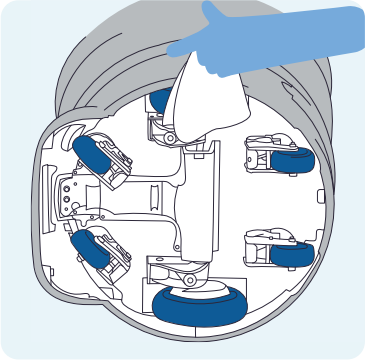 4. Remove any debris from the wheels and base
Be careful not to pinch your fingers
To hold Plato by the base, place one hand on the wheel instead of the base cover because covers can be sharp
Sensors
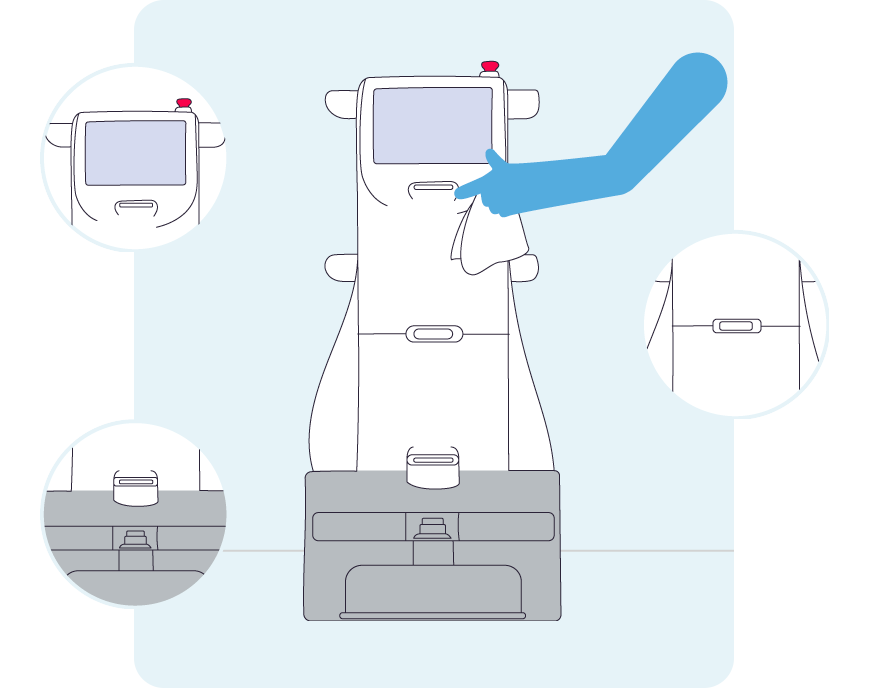
Clean Plato’s body and sensors with a soft dry cloth.
Plato can be cleaned with:
- Alcohol based detergent (Ethanol purity 50% - 75%)
- Sodium hypochlorite Sanitizer
- Alkaline electrolised water
- Neutral detergent
- IPA (Iso-propyl-alcohol)
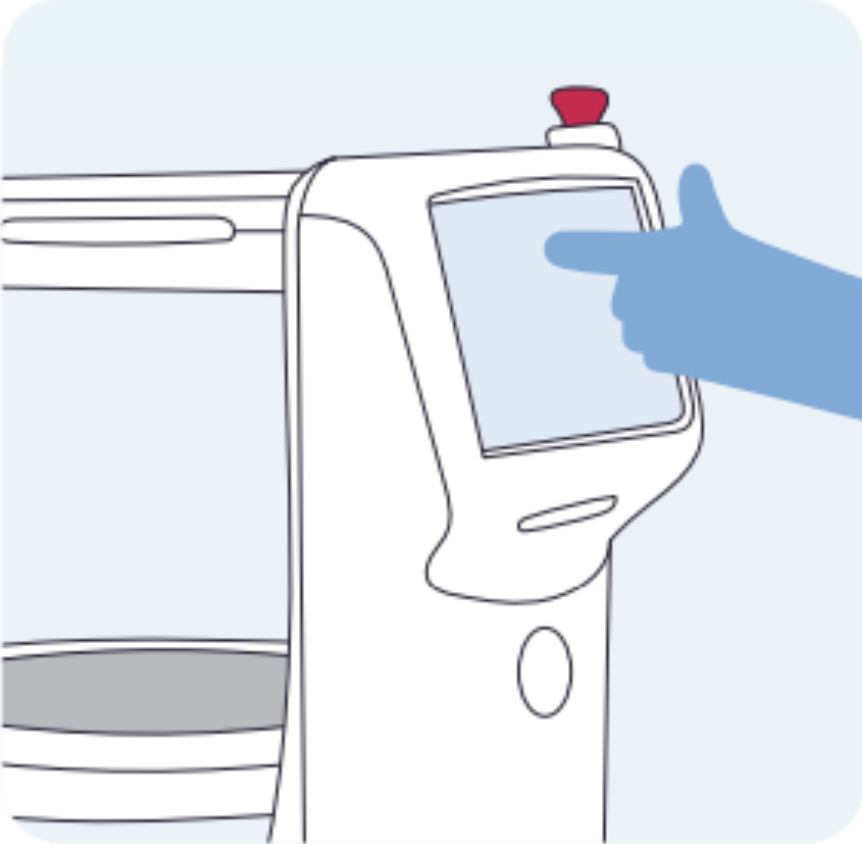
Using the Emergency button
Push it to stop Plato in case of emergency
When all is safe
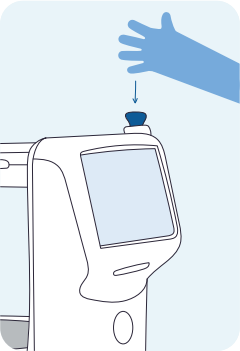
For example when:
- Plato has tipped over
- Plato does not operate properly
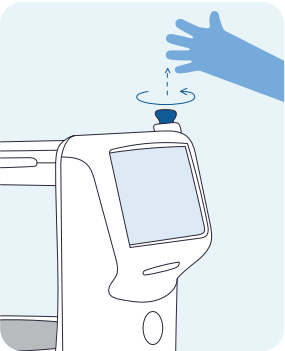
Release the Emergency Button by twisting it
Follow the instructions on Plato’s display
Regulatory authorities require the emergency stop function to be tested once a month